Kansas City Burnt Ends Nachos – Missouri | Burnt Ends, Melted Cheese, Jalapeño, Sour Cream
Kansas City Burnt Ends Nachos blend smoky BBQ, melted cheese, and spicy jalapeño for a Missouri must-try—discover the twists that make it legendary.
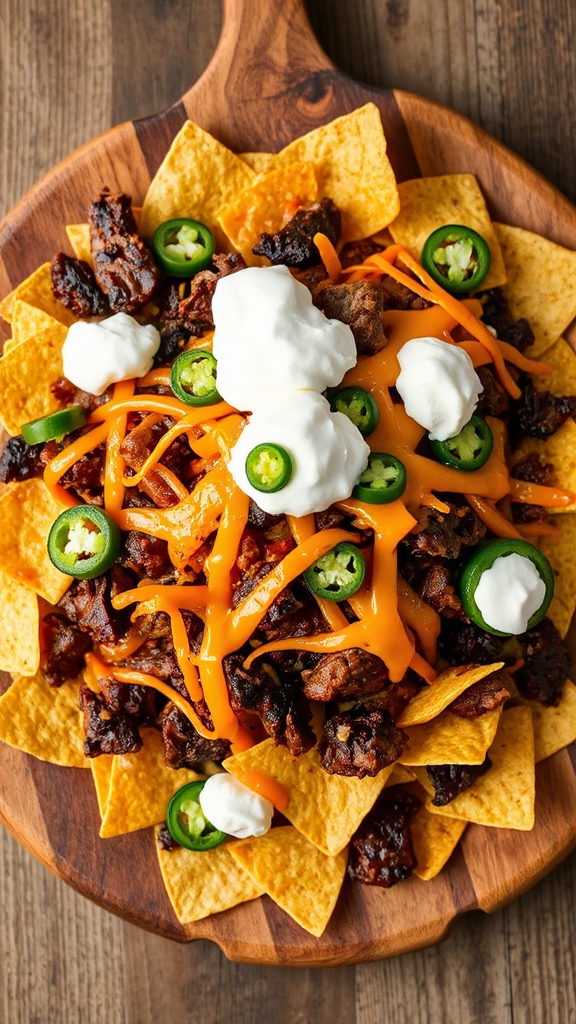
I’ve always been a fan of Kansas City Burnt Ends Nachos from Missouri—smoky, tender burnt ends layered on crunchy chips with gooey melted cheese, spicy jalapeños for heat, and cooling sour cream that ties it all together. It’s the ultimate BBQ twist on a classic snack, perfect for any gathering. If you stick around, I’ll guide you through more secrets to make your own version unforgettable.
History
Kansas City Burnt Ends Nachos originated in the barbecue-rich culture of Kansas City, Missouri, where burnt ends—the flavorful, charred ends of smoked brisket—evolved from humble barbecue traditions influenced by African American pitmasters and immigrant flavors in the Midwest.
Regional variations might include spicier Texas-style toppings or lighter Memphis-inspired rubs, signifying the adaptability of barbecue across the U.S. and its role in fostering culinary innovation.
These nachos are traditionally served at casual gatherings, sports events, festivals, and backyard barbecues, celebrating community and comfort food heritage.
Ingredients
- Tortilla chips, a big ol’ bag of ’em: You know, these crunchy triangles are the trusty base for any nacho adventure, holding up all that saucy goodness without turning into a soggy mess—what would we do without them, right? Go for the sturdy kind, like the ones that can handle a heap of toppings.
- Chopped burnt ends, about 2 cups worth: These little smoky nuggets from smoked brisket bring that iconic Kansas City vibe, all charred and flavorful—think of them as the stars of the show, the part that makes you pause and savor, even if you’re just snacking on game day.
- Cream cheese, softened to 8 ounces: This creamy stuff acts like a secret hug for your nachos, blending everything together into a dreamy layer; it’s that one ingredient that turns ordinary into “oh, wow,” without needing to overthink it, you feel me?
- Shredded cheddar cheese, maybe 2 cups packed in: Sharp and melty, this cheese is what dreams are made of on top of your chips, stretching out just right—would it be nachos without a generous blanket of this? It’s the kind that makes you wonder why we don’t put cheese on everything.
- BBQ sauce, around 1/2 cup of the Kansas City style: Thick, sweet, and tangy, this sauce ties it all together like a barbecue hug, with its molasses notes that whisper of smoky pits and good times—pick one that’s not too watery, or you’ll end up with a puddle, which, let’s be honest, is a rookie move even I could avoid.
- Diced onions, say a 1/2 cup fresh ones: These add that crisp bite and a bit of zing, cutting through the richness—onions are like that reliable friend who shows up to liven things up, even if they make your eyes water just a tad while chopping.
- Diced jalapeños, about 1/4 cup for some kick: If you’re in the mood for a playful spice that wakes up your taste buds, these green guys deliver just enough heat without overwhelming the party—go easy if you’re not a fan of sweat-inducing bites, or pile them on for that extra thrill.
- Garlic powder, a teaspoon or so: This powdered pal sneaks in a savory depth that makes everything taste more alive, like it’s whispering “hey, remember me?” in the background—it’s one of those spices that saves the day when you’re out of fresh garlic.
- Onion powder, another teaspoon to balance it out: Teaming up with its garlic buddy, this adds a mellow sweetness that rounds out the flavors, because who wants a one-note dish? It’s like the understated wingman in your spice rack, always ready to step in.
- Salt and pepper, to taste—start with 1/2 teaspoon each: These basics are the unsung heroes, tweaking things just right so nothing’s too bland or too bold; it’s that simple twist that makes you think, “How did I ever cook without measuring them out?”
- Optional bacon bits, a handful if you’re feeling fancy: Crispy and salty, these little extras crank up the fun factor, turning your nachos into a full-on feast—bacon’s like that guest who shows up uninvited but everyone loves anyway.
- Optional green onions, sliced thin for a fresh pop: A sprinkle of these adds a bright, oniony finish that cuts through the heaviness, making your plate look as good as it tastes—it’s the detail that says, “I put in a little effort here,” without going overboard.
Cooking Steps
Let’s jump into making these Kansas City Burnt Ends Nachos, where the magic happens layer by layer, turning simple ingredients into a crowd-pleasing treat.
First off, you’ll want to preheat your oven to 375°F, giving it time to get nice and hot while you prep everything else.
This step sets the stage for that perfect melt and sizzle, because who wants nachos that aren’t bubbly and irresistible?
Now, for the fun part, grab a mixing bowl and combine 8 ounces of softened cream cheese with 1/2 cup of Kansas City-style BBQ sauce, 1 teaspoon of garlic powder, and 1 teaspoon of onion powder.
Stir it all together until it’s smooth and creamy, like a secret sauce that’s about to elevate your nachos from ordinary to “can’t stop eating.”
This mixture acts as the glue that holds the flavors together, adding that tangy, smoky depth without any fuss.
- Spread a big ol’ bag of sturdy tortilla chips evenly across a baking sheet or oven-safe dish, creating a solid base that can handle all the toppings without wilting under pressure.
- Layer on about 2 cups of chopped burnt ends right over the chips, followed by 2 cups of shredded cheddar cheese, 1/2 cup of diced onions, and 1/4 cup of diced jalapeños for that fresh crunch and kick—it’s like building a flavor fortress, one ingredient at a time.
- Dollop the cream cheese mixture you’ve just made over the top, spreading it out so every chip gets a little love, then pop the whole thing into your preheated oven.
Bake for 15-20 minutes until the cheese is melted and bubbly, and everything smells so good you might wonder if it’s worth waiting.
Once it’s out, let the nachos cool for a minute or two—they’ll be piping hot, you know—before digging in, because nothing ruins a good bite like a burnt tongue, and that’s a rookie mistake we can all avoid with a little patience.
Tips and Variations
When it comes to serving up your Kansas City Burnt Ends Nachos, here’s a handy tip: always pull that creamy cheese mixture from the fridge about 10-15 minutes ahead of time, letting it chill out at room temperature so it softens just enough for easy scooping or spreading—because who wants to wrestle with a stiff dip when the nachos are calling your name?
For variations, if you’re in the mood to mix things up, swap in pepper jack cheese for the cheddar to amp up the heat with a playful kick, or toss in some crumbled bacon for an extra smoky crunch that might just make you wonder why you didn’t think of it sooner; and hey, if you’re feeling a bit lazy like I do on busy nights, use store-bought burnt ends to cut corners without sacrificing that bold, tangy vibe, turning a simple snack into your go-to crowd-pleaser with minimal fuss.
Tools
| Tool | Purpose |
|---|---|
| Baking Sheet | For assembling and baking the nachos. |
| Mixing Bowl | To combine ingredients for the cheese dip or toppings. |
| Whisk or Spoon | For stirring and mixing the cheese mixture. |
| Knife | For chopping ingredients like onions or meat. |
| Cutting Board | To provide a safe surface for cutting and preparing ingredients. |
| Measuring Cups and Spoons | For accurately measuring ingredients. |
| Oven or Grill | For cooking or reheating the burnt ends and nachos. |
| Spatula | For spreading the cheese dip or flipping ingredients. |
| Serving Platter | For presenting and serving the finished nachos. |

Hi There! I'm Stephanie Miller: Elementary teacher from Columbus, OH sharing grandma's treasured American recipes! 50 years young, yoga enthusiast & kitchen storyteller. Welcome to my food family! 🍰❤️
